Smokemont Campground Map, Great Smokey Mountains, North Carolina

Smokemont Campground Map
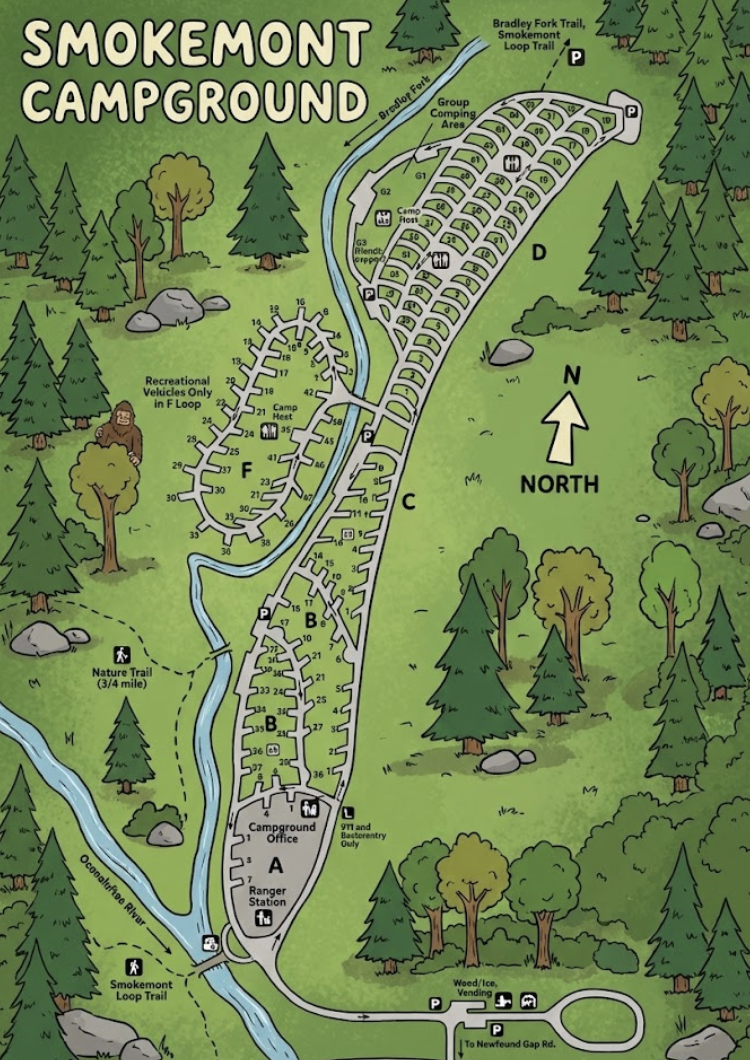
This page is a map-only guide to Smokemont Campground in Great Smoky Mountains National Park. Use it to read the campground layout (loop letters), locate key icons (restrooms, parking, camp hosts), and understand how the campground connects to nearby trails and the main park road.
- The campground is organized into lettered areas: A, B, C, D, and F.
- Loop D is the long upper section; Loop F is a separate cluster labeled Recreational Vehicles Only.
- A Group Camping Area is marked near the top of the campground corridor.
- The entrance connects from the main road area near Highway 441.
How the Campground is Shaped
Smokemont reads like a long “spine” road with loop neighborhoods branching off it. Your fastest way to navigate is to identify the loop letter first, then follow the one-way/curving internal roads until you reach your site number cluster.
The map also includes a prominent NORTH marker — useful when you’re matching the campground corridor to the direction of the upper loops and trailheads.
Loop-by-Loop Decoder (A, B, C, D, F)
Loop A sits near the lower end of the campground corridor and includes major “administrative” anchors on the map like the campground office and ranger station.
Loop B branches off the central corridor above Loop A and includes dense site spurs. It’s the kind of loop where you’ll want to use restroom/parking icons as reference points while you trace the site numbers.
Loop C is shown as part of the middle connector area between the lower loops and the long upper section. Think of it as the “bridge” that leads you toward the upper campground zones.
Loop D is the large upper area with many sites arranged along a long, curving road pattern. The map shows multiple facilities/icons along this stretch, so it’s helpful to pinpoint which icon cluster is nearest your site numbers.
Loop F is labeled Recreational Vehicles Only and appears as a separate loop cluster off the main corridor. If you’re towing or specifically in the RV-only loop, use the map’s “F Loop” label as your routing target early.
Map Icons & Anchors (Use These to Re-Orient)
When you’re inside Smokemont, the fastest way to confirm your location is to match one “big anchor” from the map to what you see on the ground:
- Campground Office and Ranger Station (lower area, near Loop A).
- Camp Host icons appear in the loop areas (use them as landmarks when tracing site numbers).
- Restrooms are marked throughout the loops — treat them as your “you are here” reference points.
- Parking (P) icons are shown near key junctions and upper areas.
- A small services cluster near the entrance area includes a label for wood/ice/vending and nearby parking.
Trails & Connections Shown on the Map
The map highlights several trail connections so you can understand what the campground “touches” without reading any outside guides:
- Bradley Fork Trail and the Smokemont Loop Trail are labeled near the upper end of the campground.
- A Nature Trail (3/4 mile) is shown off the campground corridor.
- The main road access is labeled near Highway 441, helping you orient how you enter/exit the campground area.
Practical trick: if you’re trying to figure out where you parked relative to your site, start at the map’s big labels (Loop letter, restroom icon, trail label), then work inward to the site numbers.
Smokemont Campground Map FAQ
How is Smokemont organized?
The campground is divided into lettered areas: A, B, C, D, and F, with Loop D being the large upper section.
Is there an RV-only loop?
Yes. Loop F is labeled Recreational Vehicles Only on the map.
Does the map show group camping?
Yes. A Group Camping Area is marked near the upper corridor of the campground.
Which anchors should I use to navigate on arrival?
Use the campground office and ranger station (lower area), then match restroom/parking/host icons to your loop letter and site numbers.